
You’ve decided to start making a handcraft and now, you want to sell it! You’ve made something beautiful or useful or both! That’s great, but now you might be asking yourself… how do I make money? What are markets? How do you find them? What do you need to prepare? What’s the etiquette?
Here’s a dive into how to get started including a checklist you can use to get ready for each market.
First of all its good to go into markets knowing a few things.
- There are many kinds of markets. They come in various sizes, target audiences, locations, organization, and perks.
- The way they generally work is you pay an application fee and when accepted, a booth fee. After that all your profits are yours. (These profits are taxable and need to be reported.)
- General rules of a market include taking your own payment (with something like a Square Card reader), being set up on time, adhering to booth boundaries, having all your own display props and furniture, and not tearing down or leaving early.

When you are first starting out it may seem daunting to even find markets unless you’ve already been a regular attender. I suggest attending a few first anyway to get a feel for the quality of work present, the displays artists have, and the general feel and flow of the market. Notice, as a shopper, what sellers are doing that you like or dislike. Are they making something at their booth? Did they say hello to you? Did they give you more information about a product when you showed interest? Are they hovering? These can all be clues to how you as a seller would want to conduct yourself. Also notice the display. Is it easy to shop their booth? Is it overwhelming or hard to navigate? More on these tips later.
A great way to find markets is to find festival calendars online. These won’t include everything, but you’ll find a few that may pique your interest. You should also start following some other handmade businesses in your area. Chances are they have done some markets in the area and have a few favorites they always attend. You can also find some on social media platforms by searching hashtags like #craftmarkets #handmademarket etc. To get you started check out MakersCo for the eastern US and Renegade for the Northwest of the US. Once you start doing markets you’ll hear more readily about the next one happening.
So, now you know a bit more about markets, but are you ready for one? Here’s a few things you’ll need to know to prepare. First, you will need to have enough stock to sell at a market. Depending on the size of the market you can get away with a bit less, but I suggest having about twice as much inventory as you expect to sell – this is easier to think about in monetary terms. My first market I made about $400. Now, at my largest markets I can make over $1000 in a day. I’d say shooting for around $300 for your first small market is achievable. That means you should bring stock for about $600 worth of product. That looks different for different businesses and choosing the products you make would be a whole separate discussion.

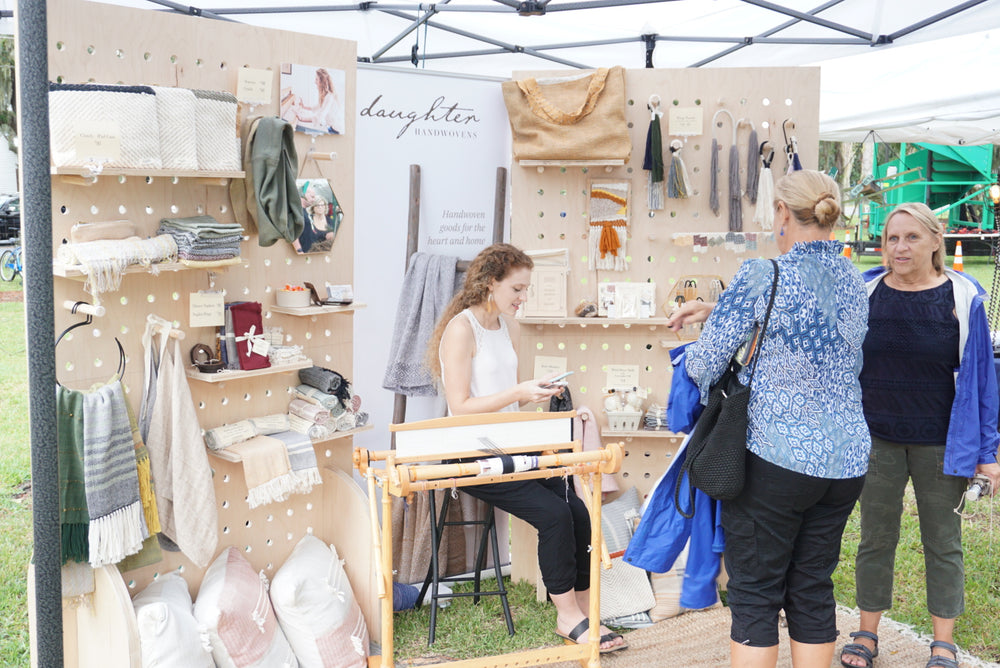
You will also need a booth display. I have written a whole post about booth display tips here, but I’ll run through the generalities. First, try to stay true to your brand. If you make high end gold jewelry with clean black and white branding you probably don’t want to use a lot of thrifted props. However, you also don’t have to spend a whole lot of money when you are getting started. A 6ft table with a tablecloth and some risers are a great starting point for most businesses.
If you want to jump ahead a bit you can check out my DIY Pegboard Display digital plans here which will teach you how to make the walls I use in my display. These are great because you are using the full height of your booth and nothing is getting lost behind each other with a deeper display.
It is also super helpful to completely lay out your booth before heading to the market – that way when you get there you aren’t figuring out your display on the spot. Take pictures of your final setup and then when you get to the market you already know when everything is going. This is also really helpful if you have an assistant helping you set up. Send them the picture and they will have a guide of where to put things.
Generally you want a display that is:
- True to your brand identity
- Portable and fits in the vehicle you’re using
- Displays all your products in a way that is eye catching from a distance and easy to shop up close
- Takes advantage of the full dimensions of your booth without being hard for patrons to navigate.
- Don’t forget yourself! You’ll want to leave space for you to sit either behind or beside your display.
- Signage for your business is also a must – your logo should be easily seen from several feet away.
- Bonus points if you have a backdrop and a space for you to work your checkout/bagging area.
Ok booth display and inventory done. Now you get into the nitty gritty – taking payment, knowing tax laws, building your following.
These days you need to be able to accept cards. That means having something like Square or Shopify to take CC payments with. When using these keep in mind you will also need to take some time before the market to input your products in the POS system so you can checkout faster once at the market. You’ll also need to set up charging tax in the app.
 Every state is different so be sure to check with a CPA or lawyer (or the state website) what your state requires. Usually you will need a Sales and Use tax ID which can usually be obtained online. Then you should check your state and local tax rates and add those on to the price of your sale. I suggest starting with markets within your state to start as selling in other states can get tricky and expensive when some of them require you to get a sales and use tax ID in their state as well and report taxes to that state also. Don’t forget to actually report those sales later.
You also want to have a way to connect with your customers after the market. A passive way to do this is to hand out business cards during the market and with purchases. Get a bit more active by starting a newsletter mailing list. Gathering emails is a great way to send those who are interested in your brand more info about your newest products, sales, or upcoming events. If you are active on social media (kind of a must) you can also have your handle clearly visible or even in QR code form so patrons can easily follow you then and there. You always want to make every part of the experience as easy for the customer as possible. Bonus points if you have some little freebie either to give away at your booth or with a purchase of a certain amount – especially if it also helps your brand, like a branded tote bag. Who doesn’t love tote bags?
Lastly, lets quickly go over some basic market etiquette. Most markets will ask you to unload your car in a specific place when you arrive and then move your car and park elsewhere before actually setting up your booth. This helps everyone unload as close and quickly as possible. You and your fellow market sellers will also need breaks at some point. It’s common to ask a neighbor (or be asked) to watch a booth while they run to the bathroom or grab food. You aren’t expected to take sales for them, just make sure nothing goes missing from their booth and let customers know the maker will be right back to complete their purchase.
Finally, the maker community is a friendly one, you may be competing in a sense, but you are all there to create an experience for the buyer and to strengthen the culture of buying handmade, supporting small business, and shopping responsibly. If you see someone struggling help them out. If you have a few free minutes, peruse the other booths and introduce yourself.
So, in conclusion, let me give you a starter checklist you can go over before every market to ensure you will be most prepared.
- Images of your booth set up
- Any material the Market Organizers gave you (booth number, parking pass, etc.)
- Payment system, card reader
- Chargers (for your phone, card reader, etc.)
- Shopping bags
- Business Cards
- All your product
- A chair or stool (if one is not provided)
- Table, tablecloth, rug (optional), and any other booth furniture or props you need
- Something related to your business you can do in quiet times. (Reading a book isn’t usually very engaging for the buyer – try bringing a part of your process so they can see what you do.)
- Lunch, snacks, drinks. (You will want at least a few bottles of water.)
- Cashbox or Fannie pack (somewhere to keep your cash)
- Cash for change
- Your mask, hand sanitizer, and wipes for your phone. If people are signing your phone you want to be able to assure them it is sanitary.
- Mailing list and pen (if you aren’t taking this digitally.
- Notebook (you never know when you’ll be asked for a custom order, wholesale info, or just meet a cool person and you want to remember something.)

That’s it! Ok, I know that might seem like a ton of information, but I would have LOVED to have all this informations when I first got started. I hope it was helpful for you! There are a lot of makers who do things differently than me so I’d encourage you to ask questions! People in this biz, in my experience at least, are kind and remember that they were in your shoes once. Just remember to pass the kindness on when you see someone else in need too.
And if you have anything to add please drop a comment below and I’ll try to keep this page updated with the most useful information!